Swiss Meringue Buttercream

I recently made a birthday cake for someone, and I was looking for a good frosting to use. Buttercream always strikes me as far too rich, and also, it’s not great in warm weather (melting frosting is not pretty). Enter meringue buttercream. The egg whites used in meringue buttercream stabilise the butter, making it great for piping designs and warm weather. There are two types of meringue buttercream: Italian and Swiss. Italian meringue buttercream involves making a sugar syrup and then pouring it into already-whipped egg whites. Swiss meringue butter involves heating the sugar and egg whites in a double boiler. Some people prefer Swiss meringue buttercream because you heat the egg whites (food safety and all that). I prefer it because it doesn’t involve a candy thermometer or me try to experimentally figure out if something is in the soft ball stage. So without further ado, I present to you Swiss meringue buttercream.

swiss meringue buttercream
Swiss Meringue Buttercream in action

Swiss Meringue Buttercream
Makes 10 cups, give or take (so if you’re making 30 or so cupcakes, you can definitely halve this)

10 (300g) egg whites
2 1/2 c (500g) sugar (doesn’t have to be caster, but that’s what I use)
680g unsalted butter, cool but not cold, and cut into cubes
1 tbs vanilla extract (plus a little more if you’re not using any other flavourings)
a pinch of salt

1. Wipe everything that you’re using (bowls, utensils, etc.) with lemon juice and a paper towel to get rid of any residual grease.

2. Put the egg whites and sugar into the top of a double boiler. Gently whisk the sugar into the egg whites.

3. Heat the egg white-sugar mixture over gently simmering water until the sugar has completely dissolved into the egg whites and the mixture feels hot to the touch.

4. Transfer the egg white mixture to a mixing bowl, and beat on medium-high speed until the egg whites are thick and glossy and the bottom of the bowl no longer feels warm to the touch. Do not proceed until the bottom of the bowl no longer feels warm, or the butter will melt.

5. With the mixer speed on low, add the cubes of butter one at a time. If the mixture curdles, keep beating and it will come back together. When the butter is completely incorporated, add the salt and vanilla and any other desired flavourings, and frost away!

Swirly Cupcakes

So, first post in awhile! I’ll start by apologising for the general appearance of these cupcakes. Yes, you can totally cut the end off of a ziploc bag and use it to pipe frosting, but the results will be, well – see for yourself! (What I’m really saying here is that I miss my cake decorating equipment.) Anyway, the chocolate cake in these is really, really super delicious, and I suppose you could substitute whatever frosting topping you want.

Before I post the recipe, I wanted to say that this is another one of my “baking problems in Poland” experiments. Basically, I couldn’t find any unsweetened cocoa powder, so I used sweetened and calculated how much cocoa I was actually getting in the sweetened stuff, and then subtracting the amount of sugar in the sweetened cocoa from the sugar originally needed in the recipe (and sort of rounding up in the process).  I love doing math. Anyway, without further delay…

swirly cupcakes

And a cross section:

swirly cupcakes 2

Swirly Cupcakes

Cake Ingredients
12 tbs melted butter
2 c all-purpose flour
1 1/2 c granulated sugar
3/4 c unsweetened cocoa powder
1/2 tsp salt
1 1/2 tsp baking powder
3/4 tsp baking soda
1 whole egg, room temperature + 1 egg white, also room temperature
1 tsp vanilla extract
1 1/3 c hot coffee (I used instant)

Topping Ingredients
1 pint of ice cream (any flavour works – I used strawberry and vanilla, fairly classic)
5 1/2 c heavy whipping cream
1/4 c confectioners’ sugar
sprinkles!

1. Preheat oven to 325 degrees F/160 degrees C. Line two cupcake tins with liners. (You might get slightly more than that – yay! I think this made about 28-30 cupcakes for me).

2. In a large mixing bowl, whisk together the dry ingredients, then stir in the butter, eggs, and vanilla until just mixed. Then, slowly stir in the coffee just until it forms a smooth batter.

3. Ladle into the cupcake tins, but fill them less than normal. You want the tops of the cupcakes to be below the top of the liner when they’re finished.

4. Bake for about 15 minutes or until a toothpick inserted into the centre comes out clean. While the cupcakes are baking, chill a bowl for the whipped cream topping.

5. Put the cupcakes onto a baking sheet. Spread a generous tablespoon of ice cream across the top of each cupcake and freeze for about 30 minutes.

6. Meanwhile, in the chilled bowl, beat the cream and confectioners’ sugar until stiff peaks form. Spoon the cream a pastry bag fitted with a large round tip (or a ziploc with the end cut off, if you live in a baking supply-deprived country). Remove the cupcakes from the freezer and pipe a swirl of cream on top of each one. Then return them to the freezer and chill until the cream is solid, about 45 minutes. Finally, remove them and decorate with the sprinkles before serving!

Makes about 30 cupcakes

Bakewell Cupcakes

My obsession with the Bakewell tart is well-documented on this blog (I’ve made a tart AND some little baby tartlets). Well, on my new favourite television show, The Great British Bake Off, one of the contestants made Bakewell cupcakes. And I just couldn’t resist (also my friends weren’t familiar with the Bakewell magic, so I felt obligated to demonstrate).

bakewell cupcakes

Bakewell Cupcakes

Ingredients
150g (5 1/2 oz) butter or margarine
150g (5 1/2 oz) caster sugar
100g (3 1/2 oz) self-raising flour (or in my case, 100g cake flour plus 1 1/4 tsp baking powder and just under 1/2 tsp salt)
3 eggs, at room temperature
1 tsp baking powder (if you’re using my made up self-raising flour, this is in addition to the baking powder there)
90g almond flour or ground almonds
1 tbs milk
a dash of almond extract
raspberry jam

250g (9 oz) icing/confectioners’ sugar
3 tbs fresh lemon juice
12 glace cherries (again, no glace cherries in Poland, so I just used some cherries from cherry compote)

1. Preheat the oven to 180C/350F/Gas 4. Line a 12-hole muffin pan with cupcake liners.

2. Beat the margarine/butter in a bowl until it is light and fluffy, then beat in the sugar. Beat in the eggs one at a time, followed by the milk and almond extract.

3. In a separate bowl, whisk together the almond flour, self-raising flour, and baking powder. Fold this into the margarine mixture.

4. Spoon the batter into the muffin tin, and bake for 15-20 minutes, until the cupcakes are golden on top and a skewer inserted into the centre comes out clean. Remove from the oven and let cool for 10 minutes.

5. When the cupcakes have cooled a bit, use a knife to cut out a bit of the center, and spoon some raspberry jam in. Replace the removed bit of cupcake as a lid (you might want to cut away the excess cake in order to get it to sit smoothly). The cross section will look like this:

bakewell cross section

6. Prepare the icing by whisking the icing sugar with the lemon juice. Spread a small amount on each cupcake and top with a cherry.

Makes 12 cupcakes

Snickerdoodle Cupcakes

I don’t really recall eating snickerdoodles growing up, which is a bit shocking as I love cinnamon. Probably the lack of chocolate turned me off to them. In any event, my first recollection of eating a snickerdoodle is over the summer, when I made them for the first time.? Last night, while engaging in my habitual reading-of-food-blogs-to-procrastinate activities, I discovered someone who mentioned making snickerdoodle cookies and snickerdoodle cupcakes and kind of gluing them together with some boiled frosting. What a fantastic idea! Here is my take on that.

snickerdoodle

Snickerdoodle Cookies
1 1/2 c all-purpose flour
1 tsp cream of tartar
1/2 tsp baking soda
1/4 tsp salt
1/2 c (1 stick) unsalted butter, at room temperature
3/4 c sugar
1 egg
1/4 c sugar
2 tbs cinnamon

1. Preheat oven to 375oF. Line a baking sheet with parchment paper.
2. In a medium bowl, sift together the flour, cream of tartar, baking soda and salt, and set aside. In a large bowl, cream the butter and sugar on medium for about 2 minutes. Add the egg and beat until combined. Then, add the flour mixture and mix until combined.
3. In a small bowl, stir the remaining 1/4 c of sugar with the cinnamon. Form dough balls about 1″ in diameter and roll in the cinnamon-sugar mixture until well-covered. Place on the baking sheet.
4. Bake for about 10 minutes, or until the cookies begin to crack on top. Remove and let cool on a wire rack.

Makes about 18-20 cookies (but we only need 12, so the extras are excellent for snacking!)

Then, make the cupcakes!

Snickerdoodle Cupcakes
1 1/2 c all-purpose flour
1 1/2 tsp baking powder
1/4 tsp salt
2 tsp cinnamon
1/2 c (1 stick) unsalted butter, at room temperature
1 c sugar
2 eggs, at room temperature
1 tsp vanilla
3/4 c buttermilk, at room temperature

1. Preheat the oven to 350oF. Line a cupcake tray with 12 liners.
2. In a medium bowl, sift together the flour, baking powder, salt and cinnamon. In a large bowl, cream together the butter and sugar. Beat in the eggs, one at a time, mixing well after each addition, followed by the vanilla. Add the flour mixture in 3 parts, alternating with the buttermilk in 2 parts (so you begin and end with the flour mixture. Mix until just combined.
3. Fill the baking cups until about 7/8 full.
4. Bake for about 17-19 minutes. Remove and let cool completely.

Makes about 12 cupcakes

And finally….

Boiled Frosting
3/4 c plus 1 tbs sugar
1/3 c water
1 tbs light corn syrup
3 large egg whites, at room temperature

1. Combine the sugar, water and corn syrup in a small saucepan. Bring to a boil over medium heat, stirring occasionally until the sugar dissolves. Continue boiling without stirring until the syrup reaches 230oF.
2. Meanwhile, in a large bowl, beat the egg whites using an electric mixer with the whisk attachment on medium-high speed, until soft peaks form. Then, mix in the 1 tbs of sugar.
3. As soon as the sugar reaches 230oF, remove it from the heat. With the mixer on medium-low speed, pour the syrup down the side of the bowl in a slow stream. Raise mixer speed to medium-high and beat until the mixture is completely cool, about 8-10 minutes.

Assembly
Spread a layer of the frosting on top of a cupcake. Press a cookie on top. Garnish with another dollop of frosting, with cinnamon sprinkled on it.

Rainbow Cupcakes

After a very long hiatus, I am back, in a new apartment (yay!) with an old kitchen (boo).

When I was growing up, my mother, like most parents, wanted to make sure that I ate healthily.  In most cases, this meant that I was not allowed to eat white bread.  However, exceptions were made for a bit of heaven sold at the local ShopRite: rainbow bread.  Rainbow bread is simply white bread, made with dyed dough, rolled together and baked normally, but the addition of colour increases its appeal (and apparently its parental approval rating) by tenfold.

Rainbow cupcakes are the cake equivalent of rainbow bread: vanilla cupcakes with rainbow swirls.  They’re no more difficult to make than regular cupcakes but have the added appeal of colour!  In other words, they are absolutely fabulous.

rainbow cupcakes

Rainbow Cake
2 c all-purpose flour
3 tsp baking powder
1/2 tsp salt
1 c sugar
4 large eggs
1 c vegetable oil
1 c buttermilk
2 tsp vanilla extract
red, yellow, green and blue food colorings

1. Preheat oven to 350oF. Line a 12-cup muffin tin pin.
2. In a medium bowl, whisk together the flour, baking powder and salt. In a large bowl, whisk together the sugar, eggs, vegetable oil, buttermilk and vanilla extract. Pour in the dry ingredients and stir until just combined.
3. Divide batter evenly into 4 small bowls and add 10-12 drops of food colouring to each bowl to make red, yellow, green and blue batters. Stir well, so no streaks of plain batter remain. Add additional food coloring if necessary.
4. Starting with the one of the batter colours, add a small spoonful to each of the muffin cups. Repeat with each of the remaining colours, going in whichever order you like. Do not attempt to spread or stir the colours, but allow them to spread on their own to achieve the layered effect.
5. Bake the cupcakes for about 15-18 minutes, until a toothpick inserted into the centre comes out clean.  Cool on a wire rack before frosting. (I whipped together some cream cheese frosting with 1 8 oz package of cream cheese, 1 c confectioners’ sugar, 1/2 tsp vanilla extract, and 1 tbs milk.)

Chocolate Torte with Blackberry Coulis

Happy Passover, everyone!  Ok, so let me start by saying that this is not a cookie,  but it IS really good.  Anyway, my friends and I had our seder on Friday night (the night before Passover starts) because it was more of a non-denominational seder with fantastic food (no fasting here…).  We started with some smoked salmon and salmon caviar (Kosher, although sturgeon is not) and makeshift matzoh crackers (bad Manischewitz for having a Tam Tam shortage!) and cream cheese and smetana (Russian sour cream).  Then we did our seder and enjoyed our fabulous meal of prime rib with roasted garlic and horseradish crust, beet, onion and horseradish relish, tzimmes, charoset, matzoh ball soup and salad with orange-fennel vinaigrette.  For desert, I brought along this chocolate torte with blackberry coulis (also Kosher for Passover) and the pareve chocolate chip cookies, which I posted earlier this week (I also did the matzoh ball soup and the salad).  The torte and the coulis were both a hit.  In fact, people were actually drinking the coulis, which I take as a compliment.

chocolate torte

Chocolate Torte wtih Blackberry Coulis
(adapted from Epicurious)

For the torte:
16 oz semisweet chocolate, chopped into chunks
14 tbs (1 7/8 sticks) salted margarine, divided
1 oz unsweetened chocolate, chopped into chunks [original recipe called for unsweetened cocoa powder, but there seemed to be a cocoa powder shortage at literally every store in my neighbourhood]
1 tsp instant coffee powder
1 c sugar
5 large eggs

For the coulis:
1 lb blackberries (frozen or fresh)
1 c plus 2 tbs semidry white wine (such as Chenin Blanc)
6 tbs sugar, divided
3 whole cloves
2 Turkish bay leaves
1/4 tsp ground allspice
1 tsp brandy

For garnish:
Fresh mint sprigs
Fresh blackberries

1.  Prepare the coulis (see below)
2.  Preheat oven to 350°F. Coat a  9-inch-diameter springform pan with margarine and line bottom with parchment.
3.  Stir 10 oz semisweet chocolate, the unsweetened chocolate and 10 tbs margarine in double boiler over low heat until smooth. Whisk in espresso. Cool 10 minutes.
4.  Beat eggs and sugar in large bowl on high speed until thick, about 6 minutes. Fold in chocolate mixture. Pour batter into prepared pan.
5.  Bake torte until dry and cracked on top and tester inserted into center comes out with some moist batter attached, about 42 minutes. Cool in pan on rack 1 hour. Do not worry if the centre falls – it is supposed to.
6.  Using spatula, press raised edges so top is level. Cut around pan sides and remove sides. Place plate atop torte and invert onto plate. Remove pan bottom; peel off paper, and cool torte completely.
7.  Stir remaining 1 cup (6 ounces) chocolate and 1/4 cup margarine in small saucepan over low heat until smooth. Whisk in 2 tablespoons blackberry coulis. Cool glaze 15 minutes, then into center of torte. Smooth top with spatula, allowing some of glaze to drip down sides. Refrigerate uncovered until glaze is set, about 1 hour. (Can be made 3 days ahead. Cover and keep refrigerated.)
7.  Cut torte into wedges; spoon coulis alongside. Garnish with mint and berries, if desired.

Coulis
1.  Place berries in a blender with wine and 4 tbs sugar and puree.  Pour into medium sauce pan.  Add the cloves, bay leaves and allspice and bring to a simmer, stirring occasionally.  Reduce heat, cover and let simmer for about 8 minutes.
2.  Strain into a bowl and discard the solids. Whisk in the brandy and remaining 2 tbs of sugar.  This can be made up to 5 days in advance.

Cassandra’s Birthday Cake

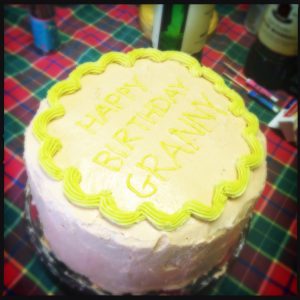
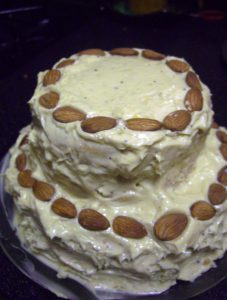
On January 28th, my friend Cassandra turned 20! To celebrate, I cooked up a little feast, which culminated in this birthday cake. It was something of a change from the rest of the meal, which was more Eastern European-themed (mushroom soup, carrot, cucumber and beet salads, and stuffed cabbages).

The cake consists of a vanilla genoise with an almond dacquoise sandwiched in between. The entire thing is then smothered in almond buttercream. I wanted to make a layer cake, but with only 4 guests, this seemed a bit excessive, so I used miniature cake pans for a smaller cake (they were 7.5″ and 5.5″ in diameter).

Genoise is typically a dry cake and is therefore drizzled with syrup, although I forewent that step because I was pressed for time. Dacquoise is similar to mergingue in texture, so it adds a nice crunch in the middle of the cake (my favourite part, in fact). However, you should eat the cake immediately, as some of the moisture from the genoise is absorbed by the dacquoise and it loses its crunch after a day or two.

birthday cake

Cassandra’s Birthday Cake
Almond Dacquoise
4 1/4 oz whole almonds, toasted
1/2 c granulated sugar
1 tbs cornstarch
3 large egg whites, at room temperature
1/2 tsp vanilla extract

1. Preheat the oven to 300oF. Lightly butter the bottom and sides of one half-sheet pan. Using a 9-inch cake pan as a guide, trace 2 circles on a sheet of parchment paper, cut to fit the half-sheet pan. Place each sheet, circle side down, on the pan. Butter the paper, then dust with flour.
2. In a food processor, combine the almonds, 1/4 c of the granulated sugar, and the cornstarch. Process until the almonds are ground to a powder.
3. In a large bowl, beat the egg whites on medium-high speed until they form soft peaks and have tripled in volume. Slowly pour in the remaining granulated sugar and vanilla and beat until the whites are stiff and glossy, being careful not to overwhip.
4. Pour the almond-sugar mixture over the egg whites and quickly fold in with a rubber spatula. Spoon the batter into a pastry bag fitted with a 1/2″ tip. Starting in the middle of one of the traced circled, pipe spirals of batter until you reach the each of the circle. Repeat for the second circle.
5. Bake the layers until they are crisp and dry and begin to brown, about 50-60 minutes. They will feel crisp on the top and will crisp completely after the are cooled. Transfer to wire racks to cook completely.

Genoise
3/4 c cake flour (not self-rising)
4 large eggs
2/3 c granulated sugar
4 tbs unsalted butter, melted and cooled
1/2 tsp vanilla extract

1. Preheat the oven to 350oF. Butter a 9-inch cake pan and line the bottom with a circle of parchment paper cut to fit. Butter the paper and dust the bottom and sides of the pan with flour.
2. Sift the flour onto a plate and set aside. Put the eggs and sugar in a deep stainless-steel bowl and set over a saucepan filled halfway with water. Bring the water to a simmer. Gently stir the eggs and sugar with a whisk for several minutes, until the sugar is completely dissolved.
3. Remove the bowl from the water. Beat the egg-sugar mixture on high speed until the batter is light, has tripled in volume and is thick enough to fall back on itself like a ribbon when a spoon is dipped and removed. (This is important, as the genoise gets its volume from the eggs only)
4. Sift the flour over the batter and fold in with as few strokes as possible. When the flour is nearly incorporated, quickly fold in the butter and vanilla as well.
5. Bake the cake until it springs back lightly when touched with a finger tip and a toothpick inserted into the centre comes out clean, about 20-30 minutes. Remove the cake from the oven, and immediately run a small knife around the inside of the pan to loosen the cake. Place a wire rack on top of the cake and invert them together. Peel the parchment off of the cake, turn it back over onto the rack and let cool completely.

Espresso-Almond Buttercream
4 large egg yolks
1/2 c sugar
1/4 c water
1 c unsalted butter, at room temperature
2 tbs instant espresso powder, dissolved in 1 tbs hot water
1 tbs amaretto
1/2 tsp almond extract

1. With a wire whisk, stir the egg yolks together in a bowl. Set aside.
2. In a small saucepan, combine the sugar and water and bring to a boil over medium-high heat. Continue to boil until the syrup reaches the soft-ball stage (239oF on an instant-read thermometer), about 5 mins.
3. When the syrup is ready, begin to bead the egg yolks with a mixer on medium speed. While beating, carefully pour the hot syrup onto the yolks. Beat until all of the syrup is incorporated, and continue to beat until the mixture is cool and thick.
4. Beat the butter into the mixture until smooth and satiny. If the mixture looks curdled and the bowl feels cold, warm it over hot water and beat again. Beat in the espresso, amaretto and almond extract.

Assembly

Slice the genoise in half using a serrated knife. Sandwich one dacquoise piece between the layers and place another on top. Cover the entire thing with frosting, and garnish with toasted almonds.