“Healthy” Chocolate Chip Cookies

With bathing suit season looming over the house, it was decided that now might be a good time for a detox diet (and besides, Buzzfeed’s Clean Eating Challenge sounded like it contained many delicious recipes, even if it did rather over-emphasise bananas). Obviously, on a detox, there’s a long list of things that you’re not supposed to eat – but then I saw a recipe for cookies with oats, and chia seeds, and dark chocolate, and sunflower/pumpkin seeds. So what if they’re not gluten-free? I declared them detox-friendly and promptly made them. (This was about 10 days in, and I needed a sugar fix.)

healthy chocolate chip cookies

“Healthy” Chocolate Chip Cookies

75g (1/3c) mixed seeds seeds (I used sunflower, pumpkin, flax, and linseed, and some pine nuts, and I toasted them first)
50g (1/2c) rolled oats (approximately scant 1/2 cup)
24g (1 tbs) chia seeds
60g (1/2c) whole-meal flour
65g (1/2c) plain flour
2g (1/2 tsp) baking soda
115g (4oz) unsalted butter, at room temperature
50g (1/4c) white sguar
80g (1/2c, packed) light brown sugar
2g (1/4tsp) fine sea salt
1 egg
1 tsp vanilla
225g (8 ounces) bittersweet chocolate, cut into small chunks

1. Preheat oven to 350F/180C/160C fan.

2. Beat the butter in a large mixing bowl until creamy (about 2 minutes). Beat in the sugars and sea salt until fluffy, then add the egg and vanilla. When well-mixed, stir in the flours, followed by the oats, seeds, and chocolate.

3. Roll into 1-inch balls and drop onto parchment-lined backing sheets with about 2 inches of space between (they will spread). Bake for 14-15 minutes and let cool for at least 10 minutes before removing from cooking sheets.

makes about 30 cookies

Salted Caramel Brown Butter Cookies

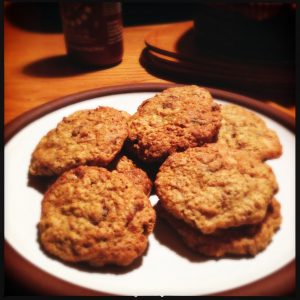
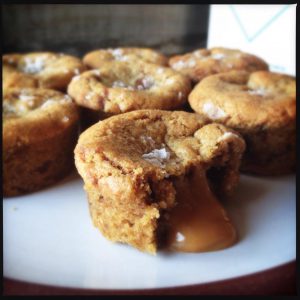
Today was one of those days where I was strangely productive, despite sleeping until nearly noon. I corrected some data issues and finished the redesign for my startup, learned two new fiddle tunes (mad Breton gavottes), practised two more to death, and baked! A friend linked to a blog post about Salted Caramel Brown Butter Cookie Cups on Facebook, and they looked delicious (I mean, who doesn’t love salted caramel? Really now.). So obviously I had to try my hand at them. In the process, I made some that looked like edible mushroom clouds (but they still tasted good!), and I learned that yes, Virginia, there is such a thing as too much salted caramel. I say this because I was eating spoonfuls of the stuff as I was filling the cookies, and by the third batch, I was definitely regretting this decision (but oddly did not stop).

The blog post that inspired me called for caramel candies to be used for the filling, but it warned that they would solidify once the cookies cooled, so I thought to myself, “Well, I can just make some dulce de leche and use that, and it will remain molten and delicious forever.” Also, I had sweetened condensed milk on hand because it is amazing for things like coffee and dulce de leche, and I didn’t have any caramel candies, nor did I feel like getting dressed to go to the shop to obtain them. Making dulce de leche is just about the easiest thing imaginable (if you have some sweetened condensed milk on hand), and it is extremely useful as a dip for apples or bananas or on ice cream or in some alfajores or…well, you get the idea. Without further ado…

salted caramel brown butter cookies


Salted Caramel Brown Butter Cookies

makes about 30

1 small can sweetened condensed milk
sea salt (I prefer Maldon)
170g unsalted butter
200 g/1 c light brown sugar
1 egg
2 tsp vanilla
250 g/2 c plain flour
2 tsp cornflour/cornstarch
1 tsp baking soda
1/2 tsp salt
chocolate chips as you see fit

1. Start by making the dulce de leche. Place the can of condensed milk unopened into a sauce pan and cover with water. Cover the saucepan, bring to a boil, and simmer for awhile (I usually aim for about 2 hours). Remove from the water wtih tongs or something to prevent your fingers from burning and let cool (submerging in cold water can assist with this process). Finally, pour into a bowl and whisk until smooth.

2. Preheat the oven to 160C fan/180C/350F. Place the butter into a small saucepan and melt over medium heat. Whisk continuously until the butter has turned golden brown and pour into a large bowl. Whisk in the brown sugar, followed by the egg and vanilla.

3. In a separate bowl, whisk together the flour, cornflour, baking soda, and salt. Stir this into the butter mixture (it gets quite thick thanks to the cornflour, so you may actually have to knead it a bit). Once the dough as cooled a bit, stir in the chocolate chips and divide the dough in half (half for the bottom of the cookie, and half for the top).

4. Line a mini-muffin tin with cupcake liners (unless it’s silicone). Place a bit of dough in each well to cover the bottom and make an indentation in the middle. Fill the indentation with caramel, and cover with another bit of dough (I flattened this bit between my hands). Sprinkle with sea salt and bake for 7-8 minutes. Let cool for at least 10-15 minutes before attempting to remove or they will fall apart (you’ve beeen warned!).

Squirrel Cookies

You know how sometimes you just really crave a cup of tea and a Hobnob, especially when it’s stormy outside? Tonight was one of those nights, except that I didn’t have any hobnobs. I thought about making oatmeal raisin cookies, but I didn’t have any raisins, so my plan was to make oatmeal cranberry white chocolate cookies. And then I went a bit mad and started adding whatever I found in the cabinet that looked tasty. This was the end result. I am calling them squirrel cookies because they contain a lot of nuts, seeds, and berries.

squirrel cookies

Squirrel Cookies

makes about 30

1 stick (113 g) unsalted butter, at room temperature
1/3 c (67 g) dark brown sugar
1/4 c (48 g) granulated sugar
1 egg
splash of almond extract
splash of vanilla extract
1 c (125 g) plain flour
1/2 tsp baking soda
1/4 tsp salt
1 1/2 c rolled oats
dried cranberries
white chocolate chopped into chunks
handful of slivered almonds
a few handfuls of toasted seeds, like pumpkin, sesame, flax, and sunflower (what, you don’t keep these on hand for baking emergencies?!)

1. Preheat the oven to 350°F/175°C. Line two baking sheets with parchment paper.

2. In a large bowl, cream together the butter and sugars. Beat in the egg, almond extract and vanilla extract.

3. In a separate bowl, whisk together the flour, baking soda and salt.

4. Beat the dry ingredients into the wet ingredients, and stir in the oats, cranberries, white chocolate chunks, almonds, and seeds.

5. Bake for 10-12 minutes, and then allow to cool on baking sheets to solidify (cookies will be soft when they come out of the oven).

Chewy Peanut Butter Cookies

I was going to the fleadh in Derry at the weekend, and of course, snacks are an essential part of festival gear for me. I tend to require a snack in the wee hours, and I rarely make it to breakfast, so it’s important that my snacks be a balanced meal. Like peanut butter cookies. Because peanut butter contains protein, and then there’s the cookie bit for carbs, so they give you enough energy to make it until lunch. Yes, this is how I rationalise eating large amounts of peanut butter cookies.

chewy peanut butter cookies

Chewy Peanut Butter Cookies

makes about 50

1/2 c (114g) unsalted butter, softened (so that you can whip it with the peanut butter)
1 c peanut butter (I used crunchy)
3/4 c (168g) caster sugar
1/2 c (100g) brown sugar
1 egg
1 tbs milk
1 tsp vanilla extract
1 1/4 c plain flour (156g)
3/4 tsp baking soda
1/2 tsp baking powder
1/4 tsp salt
extra caster sugar for rolling

1. Preheat the oven to 350 degrees F/175 degrees C and line two cookie sheets with parchment paper.

2. In a small bowl, sift together to flour, baking soda, baking powder, and salt.

3. In a large bowl, beat the butter and peanut butter together on medium-high until light and fluffy. Beat in both of the sugars until fluffy and blended, followed by the egg, vanilla extract, and milk. Finally, beat in the flour mixture until incorporated.

4. Roll a bit of the mixture into a 2cm ball, and then roll the ball in some caster sugar to coat it. Place the ball onto the cookie sheet, and repeat, spacing the balls about 2cm apart (they will spread in the oven).

5. Bake 10-12 minutes (they will not look quite done, but this is what you want) and let cool on wire racks.

Margarita Cupcakes

So, a few weeks back, we were having a party and we wanted to make sure that everything we served qualified as finger food. And so I found myself looking for a good, somewhat sophisticated summer cupcake. I was searching high and low (on the internet) trying to find something that I thought encapsulated the flavours of summer…and then I read about margarita cupcakes. I couldn’t find a recipe that I totally approved of, so here’s my take on it. Make sure you have limes. Lots of limes.

margarita cupcakes

Margarita Cupcakes
makes about 30 cupcakes

Ingredients
3 c all-purpose flour (325 g)
1 tbs baking powder
1/2 tsp salt
1 c unsalted butter, at room temperature (225 g)
2 c sugar (450 g)
4 eggs
3 limes, zested and juiced
1/2 tsp vanilla
1 c butter milk
1/2 recipe of Swiss Meringue Buttercream, plus two limes zested and juiced for flavouring and 1 tbs tequila
tequila
tequila for glazing
extra lime zest and sea salt flakes (salt the rim!) for topping

1. Preheat the oven to 325 degrees Farenheit (160 degrees Celsius). Whisk the flour, baking powder, and salt together to remove any lumps in a medium bowl.

2. Beat the butter and sugar together on medium-high speed until fluffy. Add the eggs one at a time, followed by the vanilla. Beat in the lime juice and zest.

3. Add the flour in three batches alternating with the buttermilk, beginning and ending with the flour.

4. Spoon the batter into pre-lined cupcake tins until they are 2/3 full. Bake the cupcakes for 25 minutes.

5. While the cupcakes are baking, prepare the Swiss Meringue Buttercream. Once the cupcakes are out of the oven, glaze them with the tequila set aside for that purpose. Once they are completely cool, top with the meringue buttercream, and sprinkle some lime zest and sea salt for garnish.

Swiss Meringue Buttercream

I recently made a birthday cake for someone, and I was looking for a good frosting to use. Buttercream always strikes me as far too rich, and also, it’s not great in warm weather (melting frosting is not pretty). Enter meringue buttercream. The egg whites used in meringue buttercream stabilise the butter, making it great for piping designs and warm weather. There are two types of meringue buttercream: Italian and Swiss. Italian meringue buttercream involves making a sugar syrup and then pouring it into already-whipped egg whites. Swiss meringue butter involves heating the sugar and egg whites in a double boiler. Some people prefer Swiss meringue buttercream because you heat the egg whites (food safety and all that). I prefer it because it doesn’t involve a candy thermometer or me try to experimentally figure out if something is in the soft ball stage. So without further ado, I present to you Swiss meringue buttercream.

swiss meringue buttercream
Swiss Meringue Buttercream in action

Swiss Meringue Buttercream
Makes 10 cups, give or take (so if you’re making 30 or so cupcakes, you can definitely halve this)

10 (300g) egg whites
2 1/2 c (500g) sugar (doesn’t have to be caster, but that’s what I use)
680g unsalted butter, cool but not cold, and cut into cubes
1 tbs vanilla extract (plus a little more if you’re not using any other flavourings)
a pinch of salt

1. Wipe everything that you’re using (bowls, utensils, etc.) with lemon juice and a paper towel to get rid of any residual grease.

2. Put the egg whites and sugar into the top of a double boiler. Gently whisk the sugar into the egg whites.

3. Heat the egg white-sugar mixture over gently simmering water until the sugar has completely dissolved into the egg whites and the mixture feels hot to the touch.

4. Transfer the egg white mixture to a mixing bowl, and beat on medium-high speed until the egg whites are thick and glossy and the bottom of the bowl no longer feels warm to the touch. Do not proceed until the bottom of the bowl no longer feels warm, or the butter will melt.

5. With the mixer speed on low, add the cubes of butter one at a time. If the mixture curdles, keep beating and it will come back together. When the butter is completely incorporated, add the salt and vanilla and any other desired flavourings, and frost away!

Banana Walnut Bread

I’ve had something of a weird relationship with bananas over time. For awhile, I wouldn’t go anywhere near one, and the smell is not one of my favourites. I still won’t touch a banana chip, and the thought of them in something (like chocolate or banoffee pie) turns my stomach.

Oddly, I’ve always liked banana bread. On my recent visit to Ireland, I was greeted with a freshly baked loaf, and since I needed to do something non-work-related this week, I decided to bake my own (along with some roasted red pepper hummus and minestrone soup…but that’s a different story). Well, it turns out that getting bananas in Krakow is, like getting many other food-related items in Krakow, not the easiest thing to do! In the end, I just schlepped out to Tesco, the one place that consistently has decent produce during all four seasons – and after three days of constant checking to see whether my ingredients were ready to be turned into bread, they were finally ripe enough today! So – banana bread!

banana bread

Banana Bread

Ingredients
285g/10oz all-purpose flour
1 tsp baking soda
1/2 tsp salt
1 tsp cinnamon
110g/4oz butter, plus extra for greasing the pans
225g/8oz caster sugar
2 eggs
4 ripe/overripe bananas, mashed (or you can puree them in a food processor until they’re chunky)
85ml/3fl oz buttermilk
1 tsp vanilla extract
110g/4oz toasted walnuts

1 Heat the oven to 180C/350F/Gas 4. Toast the walnuts for about 10-15 minutes, and remove to cool.

2. Sift the flour, baking soda, salt, and cinnamon in a medium bowl.

3. In a large bowl, cream the butter and sugar together until light and fluffy.

4. Add the eggs, mashed bananas, buttermilk and vanilla extract (at this point, I also threw in 2 tablespoons of golden syrup for kicks) to the butter and sugar mixture and mix well, then fold in the flour mixture, followed by the walnuts.

5. Grease and flour two large loaf pans (or four small ones) and pour the batter into them.

6. Bake one hour, or until the breads are firm. Remove to cool on wire racks.

Swirly Cupcakes

So, first post in awhile! I’ll start by apologising for the general appearance of these cupcakes. Yes, you can totally cut the end off of a ziploc bag and use it to pipe frosting, but the results will be, well – see for yourself! (What I’m really saying here is that I miss my cake decorating equipment.) Anyway, the chocolate cake in these is really, really super delicious, and I suppose you could substitute whatever frosting topping you want.

Before I post the recipe, I wanted to say that this is another one of my “baking problems in Poland” experiments. Basically, I couldn’t find any unsweetened cocoa powder, so I used sweetened and calculated how much cocoa I was actually getting in the sweetened stuff, and then subtracting the amount of sugar in the sweetened cocoa from the sugar originally needed in the recipe (and sort of rounding up in the process).  I love doing math. Anyway, without further delay…

swirly cupcakes

And a cross section:

swirly cupcakes 2

Swirly Cupcakes

Cake Ingredients
12 tbs melted butter
2 c all-purpose flour
1 1/2 c granulated sugar
3/4 c unsweetened cocoa powder
1/2 tsp salt
1 1/2 tsp baking powder
3/4 tsp baking soda
1 whole egg, room temperature + 1 egg white, also room temperature
1 tsp vanilla extract
1 1/3 c hot coffee (I used instant)

Topping Ingredients
1 pint of ice cream (any flavour works – I used strawberry and vanilla, fairly classic)
5 1/2 c heavy whipping cream
1/4 c confectioners’ sugar
sprinkles!

1. Preheat oven to 325 degrees F/160 degrees C. Line two cupcake tins with liners. (You might get slightly more than that – yay! I think this made about 28-30 cupcakes for me).

2. In a large mixing bowl, whisk together the dry ingredients, then stir in the butter, eggs, and vanilla until just mixed. Then, slowly stir in the coffee just until it forms a smooth batter.

3. Ladle into the cupcake tins, but fill them less than normal. You want the tops of the cupcakes to be below the top of the liner when they’re finished.

4. Bake for about 15 minutes or until a toothpick inserted into the centre comes out clean. While the cupcakes are baking, chill a bowl for the whipped cream topping.

5. Put the cupcakes onto a baking sheet. Spread a generous tablespoon of ice cream across the top of each cupcake and freeze for about 30 minutes.

6. Meanwhile, in the chilled bowl, beat the cream and confectioners’ sugar until stiff peaks form. Spoon the cream a pastry bag fitted with a large round tip (or a ziploc with the end cut off, if you live in a baking supply-deprived country). Remove the cupcakes from the freezer and pipe a swirl of cream on top of each one. Then return them to the freezer and chill until the cream is solid, about 45 minutes. Finally, remove them and decorate with the sprinkles before serving!

Makes about 30 cupcakes

Bakewell Cupcakes

My obsession with the Bakewell tart is well-documented on this blog (I’ve made a tart AND some little baby tartlets). Well, on my new favourite television show, The Great British Bake Off, one of the contestants made Bakewell cupcakes. And I just couldn’t resist (also my friends weren’t familiar with the Bakewell magic, so I felt obligated to demonstrate).

bakewell cupcakes

Bakewell Cupcakes

Ingredients
150g (5 1/2 oz) butter or margarine
150g (5 1/2 oz) caster sugar
100g (3 1/2 oz) self-raising flour (or in my case, 100g cake flour plus 1 1/4 tsp baking powder and just under 1/2 tsp salt)
3 eggs, at room temperature
1 tsp baking powder (if you’re using my made up self-raising flour, this is in addition to the baking powder there)
90g almond flour or ground almonds
1 tbs milk
a dash of almond extract
raspberry jam

250g (9 oz) icing/confectioners’ sugar
3 tbs fresh lemon juice
12 glace cherries (again, no glace cherries in Poland, so I just used some cherries from cherry compote)

1. Preheat the oven to 180C/350F/Gas 4. Line a 12-hole muffin pan with cupcake liners.

2. Beat the margarine/butter in a bowl until it is light and fluffy, then beat in the sugar. Beat in the eggs one at a time, followed by the milk and almond extract.

3. In a separate bowl, whisk together the almond flour, self-raising flour, and baking powder. Fold this into the margarine mixture.

4. Spoon the batter into the muffin tin, and bake for 15-20 minutes, until the cupcakes are golden on top and a skewer inserted into the centre comes out clean. Remove from the oven and let cool for 10 minutes.

5. When the cupcakes have cooled a bit, use a knife to cut out a bit of the center, and spoon some raspberry jam in. Replace the removed bit of cupcake as a lid (you might want to cut away the excess cake in order to get it to sit smoothly). The cross section will look like this:

bakewell cross section

6. Prepare the icing by whisking the icing sugar with the lemon juice. Spread a small amount on each cupcake and top with a cherry.

Makes 12 cupcakes

The Great British Bake Off

Lately, I have become obsessed with a television programme on BBC2 – The Great British Bake Off. It combines two of my favourite things, baking and Britain – so what could be better?!

gbbo

Anyway, the premise of the show is that they are looking for “the best amateur baker in Britain”, starting off with a cast of 12 bakers and eliminating them weekly in 1’s and 2’s. The bakers participate in three challenges throughout the show – a signature bake, in which they show off their “signature” item in a category, a blind bake, where everyone bakes identical recipes assigned by the two judges (this is to measure technical skill), and finally, a showstopper bake, which is meant to impress the judges. There are little historical segments interspersed (my favourites were about Henry VIII’s kitchen devoted solely to tarts, and the the bit about how bakers made all sorts of crazy substitutions during WWII rationing).

The signature and showstopper bakes tend to produce some pretty creative (and delicious) items, which I then recreate in my own little test kitchen. My favourite baker, who is still on the show, is Mary-Anne, because her recipes are almost always innovative and different than her competitors’, and she has a massive cookbook collection.

Anyway, if you live someplace where you can get BBC2, I highly recommend giving this show a try. There is only one episode left in the season, but you can get all of the older eps on iplayer. And some of the recipes are available on the BBC website.

They have a Twitter feed: http://twitter.com/#!/BritishBakeOff
And a website that doesn’t seem to get updated: http://www.thegreatbritishbakeoff.co.uk/
And here are the recipes: http://www.bbc.co.uk/food/programmes/b013pqxw