“Healthy” Chocolate Chip Cookies

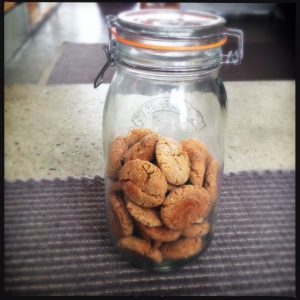
With bathing suit season looming over the house, it was decided that now might be a good time for a detox diet (and besides, Buzzfeed’s Clean Eating Challenge sounded like it contained many delicious recipes, even if it did rather over-emphasise bananas). Obviously, on a detox, there’s a long list of things that you’re not supposed to eat – but then I saw a recipe for cookies with oats, and chia seeds, and dark chocolate, and sunflower/pumpkin seeds. So what if they’re not gluten-free? I declared them detox-friendly and promptly made them. (This was about 10 days in, and I needed a sugar fix.)

healthy chocolate chip cookies

“Healthy” Chocolate Chip Cookies

75g (1/3c) mixed seeds seeds (I used sunflower, pumpkin, flax, and linseed, and some pine nuts, and I toasted them first)
50g (1/2c) rolled oats (approximately scant 1/2 cup)
24g (1 tbs) chia seeds
60g (1/2c) whole-meal flour
65g (1/2c) plain flour
2g (1/2 tsp) baking soda
115g (4oz) unsalted butter, at room temperature
50g (1/4c) white sguar
80g (1/2c, packed) light brown sugar
2g (1/4tsp) fine sea salt
1 egg
1 tsp vanilla
225g (8 ounces) bittersweet chocolate, cut into small chunks

1. Preheat oven to 350F/180C/160C fan.

2. Beat the butter in a large mixing bowl until creamy (about 2 minutes). Beat in the sugars and sea salt until fluffy, then add the egg and vanilla. When well-mixed, stir in the flours, followed by the oats, seeds, and chocolate.

3. Roll into 1-inch balls and drop onto parchment-lined backing sheets with about 2 inches of space between (they will spread). Bake for 14-15 minutes and let cool for at least 10 minutes before removing from cooking sheets.

makes about 30 cookies

Chewy Peanut Butter Cookies

I was going to the fleadh in Derry at the weekend, and of course, snacks are an essential part of festival gear for me. I tend to require a snack in the wee hours, and I rarely make it to breakfast, so it’s important that my snacks be a balanced meal. Like peanut butter cookies. Because peanut butter contains protein, and then there’s the cookie bit for carbs, so they give you enough energy to make it until lunch. Yes, this is how I rationalise eating large amounts of peanut butter cookies.

chewy peanut butter cookies

Chewy Peanut Butter Cookies

makes about 50

1/2 c (114g) unsalted butter, softened (so that you can whip it with the peanut butter)
1 c peanut butter (I used crunchy)
3/4 c (168g) caster sugar
1/2 c (100g) brown sugar
1 egg
1 tbs milk
1 tsp vanilla extract
1 1/4 c plain flour (156g)
3/4 tsp baking soda
1/2 tsp baking powder
1/4 tsp salt
extra caster sugar for rolling

1. Preheat the oven to 350 degrees F/175 degrees C and line two cookie sheets with parchment paper.

2. In a small bowl, sift together to flour, baking soda, baking powder, and salt.

3. In a large bowl, beat the butter and peanut butter together on medium-high until light and fluffy. Beat in both of the sugars until fluffy and blended, followed by the egg, vanilla extract, and milk. Finally, beat in the flour mixture until incorporated.

4. Roll a bit of the mixture into a 2cm ball, and then roll the ball in some caster sugar to coat it. Place the ball onto the cookie sheet, and repeat, spacing the balls about 2cm apart (they will spread in the oven).

5. Bake 10-12 minutes (they will not look quite done, but this is what you want) and let cool on wire racks.

Margarita Cupcakes

So, a few weeks back, we were having a party and we wanted to make sure that everything we served qualified as finger food. And so I found myself looking for a good, somewhat sophisticated summer cupcake. I was searching high and low (on the internet) trying to find something that I thought encapsulated the flavours of summer…and then I read about margarita cupcakes. I couldn’t find a recipe that I totally approved of, so here’s my take on it. Make sure you have limes. Lots of limes.

margarita cupcakes

Margarita Cupcakes
makes about 30 cupcakes

Ingredients
3 c all-purpose flour (325 g)
1 tbs baking powder
1/2 tsp salt
1 c unsalted butter, at room temperature (225 g)
2 c sugar (450 g)
4 eggs
3 limes, zested and juiced
1/2 tsp vanilla
1 c butter milk
1/2 recipe of Swiss Meringue Buttercream, plus two limes zested and juiced for flavouring and 1 tbs tequila
tequila
tequila for glazing
extra lime zest and sea salt flakes (salt the rim!) for topping

1. Preheat the oven to 325 degrees Farenheit (160 degrees Celsius). Whisk the flour, baking powder, and salt together to remove any lumps in a medium bowl.

2. Beat the butter and sugar together on medium-high speed until fluffy. Add the eggs one at a time, followed by the vanilla. Beat in the lime juice and zest.

3. Add the flour in three batches alternating with the buttermilk, beginning and ending with the flour.

4. Spoon the batter into pre-lined cupcake tins until they are 2/3 full. Bake the cupcakes for 25 minutes.

5. While the cupcakes are baking, prepare the Swiss Meringue Buttercream. Once the cupcakes are out of the oven, glaze them with the tequila set aside for that purpose. Once they are completely cool, top with the meringue buttercream, and sprinkle some lime zest and sea salt for garnish.

Banana Walnut Bread

I’ve had something of a weird relationship with bananas over time. For awhile, I wouldn’t go anywhere near one, and the smell is not one of my favourites. I still won’t touch a banana chip, and the thought of them in something (like chocolate or banoffee pie) turns my stomach.

Oddly, I’ve always liked banana bread. On my recent visit to Ireland, I was greeted with a freshly baked loaf, and since I needed to do something non-work-related this week, I decided to bake my own (along with some roasted red pepper hummus and minestrone soup…but that’s a different story). Well, it turns out that getting bananas in Krakow is, like getting many other food-related items in Krakow, not the easiest thing to do! In the end, I just schlepped out to Tesco, the one place that consistently has decent produce during all four seasons – and after three days of constant checking to see whether my ingredients were ready to be turned into bread, they were finally ripe enough today! So – banana bread!

banana bread

Banana Bread

Ingredients
285g/10oz all-purpose flour
1 tsp baking soda
1/2 tsp salt
1 tsp cinnamon
110g/4oz butter, plus extra for greasing the pans
225g/8oz caster sugar
2 eggs
4 ripe/overripe bananas, mashed (or you can puree them in a food processor until they’re chunky)
85ml/3fl oz buttermilk
1 tsp vanilla extract
110g/4oz toasted walnuts

1 Heat the oven to 180C/350F/Gas 4. Toast the walnuts for about 10-15 minutes, and remove to cool.

2. Sift the flour, baking soda, salt, and cinnamon in a medium bowl.

3. In a large bowl, cream the butter and sugar together until light and fluffy.

4. Add the eggs, mashed bananas, buttermilk and vanilla extract (at this point, I also threw in 2 tablespoons of golden syrup for kicks) to the butter and sugar mixture and mix well, then fold in the flour mixture, followed by the walnuts.

5. Grease and flour two large loaf pans (or four small ones) and pour the batter into them.

6. Bake one hour, or until the breads are firm. Remove to cool on wire racks.

The Great British Bake Off

Lately, I have become obsessed with a television programme on BBC2 – The Great British Bake Off. It combines two of my favourite things, baking and Britain – so what could be better?!

gbbo

Anyway, the premise of the show is that they are looking for “the best amateur baker in Britain”, starting off with a cast of 12 bakers and eliminating them weekly in 1’s and 2’s. The bakers participate in three challenges throughout the show – a signature bake, in which they show off their “signature” item in a category, a blind bake, where everyone bakes identical recipes assigned by the two judges (this is to measure technical skill), and finally, a showstopper bake, which is meant to impress the judges. There are little historical segments interspersed (my favourites were about Henry VIII’s kitchen devoted solely to tarts, and the the bit about how bakers made all sorts of crazy substitutions during WWII rationing).

The signature and showstopper bakes tend to produce some pretty creative (and delicious) items, which I then recreate in my own little test kitchen. My favourite baker, who is still on the show, is Mary-Anne, because her recipes are almost always innovative and different than her competitors’, and she has a massive cookbook collection.

Anyway, if you live someplace where you can get BBC2, I highly recommend giving this show a try. There is only one episode left in the season, but you can get all of the older eps on iplayer. And some of the recipes are available on the BBC website.

They have a Twitter feed: http://twitter.com/#!/BritishBakeOff
And a website that doesn’t seem to get updated: http://www.thegreatbritishbakeoff.co.uk/
And here are the recipes: http://www.bbc.co.uk/food/programmes/b013pqxw

Stained Glass Pudding

What would one call this? Jell-o suspended in a condensed milk gelatin? It’s not really a pudding. Anyway, whilst reading the New York Times recipe, I came across this article and decided that I would attempt to recreate the concoction shown the in title photograph. Now, I loathe basically all Jell-o because I am not a fan of blatantly artificial flavouring, but I really like condensed milk, especially when it’s caramelised into dulce de leche. But that is fodder for another post. I figured that maybe putting the Jell-o in something I liked would make me enjoy it – this was faulty reasoning, as I keep picking the Jell-o out and only eating the condensed milk pudding part. I used cherry, blue raspberry, orange, pineapple and “melon fusion” because I wanted a rainbow of colours. Having tasted the product, I would recommend thinking about how the flavours will mix before preparing – the melon fusion, which was by far my least favourite, completely over powered all of the others with its fake watermelony flavour, and it also tainted the taste of the condensed milk portion. But, on a bright note, it does look pretty!

Jello Pudding

Stained Glass Pudding

4-5 3.0 oz packages of Jell-o powder (I used 5, I think 4 would have worked better)
2 packages of Knox plain gelatin powder
1 14 oz can of sweetened condensed milk

1. Prepare the Jell-o in separate containers according to the instructions on the package. Let set for 3+ hours in a refrigerator.

2. Remove the Jell-o from the refrigerator and slice into small cubes or other shapes. Gently place in a 9×13″ pan and toss to mix up the colours.

3. In a medium bowl, dissolve the plain gelatin packages in 1/2 c cold water. Once the gelatin “blooms” (it will look all bubbly on top), dissolve in 1 1/2 c boiling water, then stir in the condensed milk. Briefly let this mixture cool a bit (so that it does not melt the Jell-o shapes), and into the 9×13″ pan over the Jell-o shapes. At this point, you may want to smooth out the air bubbles on top for a cleaner look (I didn’t). Let set in the refrigerator overnight.

Makes a 9×13″ tray of Jell-o-ish pudding

Apple Butter

I really wanted to make something with the apples I picked that was not a pie, because I have a lot of them, and when you have a lot of apples, you need to cook them down to make them go away.  I went to Philadelphia to visit my sister on Sunday, and I brought her some apples, plus pel’meni and churchkhela, but I still had a lot left over (say, 17 lbs or so).  I found a cookie recipe that sounded fun, but it used apple butter, not plain apples…SO.  I decided to make some apple butter, and then use what I needed to make cookies and can the rest.  I love canning things (see: Meringue Tartlets).

apple butter

Apple Butter
about 4 lbs (which is about 15) apples – I used an assortment from my picking
2 c apple cider
1 c apple cider vinegar
1 c water
2 tsp ground cinnamon
1 tsp ground allspice
1 tsp ground nutmeg
1/2 tsp ground cloves
1 1/2 c sugar (you can use more – I didn’t want this to be too sweet, though)

1. Wash the apples and cut them into quarters. Do NOT peel or core them – much of the flavour is in the peel, and much of the pectin (a gelling agent) is in the cores – but do cut out the damaged parts. Put the apples into large pot, add the cider, vinegar and water, cover, bring to a boil, reduce heat to simmer and cook until apples are soft, about 30 minutes. Remove from heat.
2. Press the mixture through a fine-mesh sieve or a foodmill into a large bowl. Return back to the large pot, and stir in the sugar and spices.
3. Bring to a boil, then reduce heat to medium-low, and simmer for about 1 1/2 to 2 hours, until the mixture is very thick, stirring frequently to prevent sticking and burning.
4. Sterilize your canning jars and lids (but not bands) by running them through short wash on the dishwasher (my method) or putting them in a pot of nearly-boiling water for about 10 minutes (my mother’s method). The jars should still be hot when the apple butter is poured in because this will prevent the jars from cracking. Pour in the apple butter, leaving about 1/4″ space at the top. Wipe down the lip of the jar and place the lid and band on. Tighten the band. Place filled and sealed jars in a hot water bath, making sure that they are covered with water. Simmer for 20 minutes to process. Turn off the heat and allow the jars to stand in the water for about 5 minutes to become acclimated to the room temperature, then remove, set upright on a towel (to prevent breakage) and allow to stand undisturbed for 12 to 24 hours to ensure a proper seal.

Makes about 4 1/2 – 5 pints

Vegetable Lasagne

I have decided to change the name of this site to Jillian’s Baking instead of Jillian’s Cookies, since I have somewhat expanded my recipes to include things that are baked but not cookies.

From my dinner-with-parents last week, I had a bunch of leftover spinach. So, I decided to make lasagne. I am not really a big meat eater, especially of ground meat, and I thought that making a tasty vegetable lasagne would be better than meat, especially since I could then take advantage of the lovely fall harvest, which is in full swing right now. I made 1/3 of mine with a limited amount of cheese for the lactose intolerant among us. Also, I kind of made this up as I went along but it definitely turned out alright.

lasagna

Vegetable Lasagne
1 box oven-ready lasagne pasta
3-4 c chunky tomato sauce (I make my own – see below for that)
1 15 oz container ricotta cheese
4 c mozzarella, shredded
1/2 c grated Pecorino Romano cheese
1 egg
1 medium zucchini, chopped
6 c fresh spinach leaves
2 c mushrooms, chopped
2 cloves garlic, minced
Olive oil
Salt
Black pepper

1. Bring a pot of water to a boil and immerse the spinach leaves for 2-3 minutes Drain well and pat dry.

2. Heat 3 tbs olive oil in a saute pan. Place the garlic in the pan and saute for 2 mins. Add the vegetables, season with salt and pepper to taste, and saute for 6-8 mins, until everything is slighly softened and well-seasoned.

3. Preheat oven to 350oF. Stir egg with ricotta, Parmesan cheese, 2 c of the shredded mozzarella, and 1/4 c of the tomato sauce in a medium bowl.

4. In a 9″x13″x2″ pan, spread 1 c sauce to cover the bottom. Layer 4 lasagne sheets, slightly overlapping. Spread half of the ricotta mixture, then spoon half of the vegetables over that and sprinkle 1 c of the mozzarella. Spread 1 1/2 c tomato sauce. Repeat layering lasagne sheets, remaining ricotta mixture, remaining vegetables, some mozzarella and 1 1/2 c sauce. The final layer will have 4 lasagne sheets, the remaining sauce and the remaining mozzarella.

5. Bake approximately 40-50 minutes, until bubbly and cheese on top is browned. Let stand 10-15 minutes before cutting.

Marble Loaf

During my hunt for some recipe ideas and suggestions for banana bread, I came across a Marble Cake with White Chocolate Glaze recipe in The Martha Stewart Baking Handbook. It looked really, really good, so I decided to make it – with my own variations, of course.

I’ve also been into miniaturising recipes for full-size quick breads, because mini-sized ones are easier to distribute, and most of my baking gets given away.

marble loaf

Marble Loaf
1 stick (1/2 c) unsalted butter, at room temperature
1 3/4 c cake flour (not self-rising)
2 tsp baking powder
1/2 tsp salt
1 c sugar
3 large eggs, at room temperature
1 tsp vanilla extract
3/4 c buttermilk, at room temperature
1/4 c + 1 tbs cocoa powder
1/4 c + 2 tbs boiling water

1. Preheat the oven to 350oF. Generously butter a loaf pan.
2. Whisk together the flour, bakingg soda and salt and set aside.
3. Beat butter and sugar on medium speed until fluffy, about 5 minutes. Add egs, one at a time, beating until combined after each addition. Mix in the vanilla. Add the flour mixture in 2 batches, alternating with the buttermilk and beginning and ending with the flour. Set aside 1/3 of the batter.
4. In a bowl, mix together the cocoa powder and boiling water until smooth. Stir into the smaller portion of the cake batter and mix until well-combined.
5. Spoon the 1/3 of the white batter into the prepared loaf pan. Then make a checkerboard pattern on top with the remaining white batter and the chocolate batter. Run a knife through to create a marbled pattern.
6. Bake, rotating pan halfway through, 40-50 minutes, until a toothpick inserted into the center comes out clean. Transfer to a wire rack to cool in pan 10 minutes, then turn out onto the wire rack to cool completely. Glaze.

White Chocolate Glaze
3/4 c sifted confectioners’ sugar
2 tbs buttermilk
2 1/4 oz melted and cooled white chocolate

Whisk together the buttermilk and sugar. Sitr in the white chocolate and mix until smooth.