Stained Glass Cookies

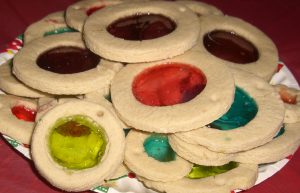
Once, when I was little, my mom decided that we should try to make windows in our annual gingerbread houses by melting hard candies in spaces.  This did not work out well.  However, I decided to give these a try, this time, lining the baking sheets withoarchment to prevent sticking (a problem with the gingerbread).  One of the great things about stained glass cookies is that they can be used to decorate Christmas trees.  Simply poke a hole in the dough before baking (I used a needle) and then widen it a little bit when the cookies come out of the oven.  Then you can run some thread through to hang them easily.

Sophie likes them, too!

Stained Glass Cookies
2 1/2 c all-purpose flour
3/4 tsp salt
1 1/2 sticks (3/4 c) unsalted butter, at room temperature
3/4 c granulated sugar
1 egg
1 tsp vanilla
6-8 oz fruit-flavored hard candies (Jolly Ranchers work well)

1.  Whisk together flour and salt in a medium bowl and set aside.  Beat together butter and sugar in a large bowl until pale and fluffy, then beat in egg and vanilla. Add flour mixture and mix until just combined.
2.  Shape dough into 3 disks, wrap in plastic wrap, and chill until firm, at least 2 hours.  Meanwhile, unwrap candies and separate by color in small heavy-duty Ziploc bags.  Wrap the bags in kitchen towls and pound with a rolling pin to crush the candies.
3. Preheat oven to 350oF and line 2 baking sheets with parchment paper.  Roll out one dough round to 1/8 inch thick on a well-floured surface with floured rolling pin. Cut out cookies with a large round cutter, then cut out centers (and throw into scrap pile) from those with a small round cutter and transfer to the baking sheets.  Spoon about 1/2 to 1 teaspoon crushed candy in the center of each cookie. (If you want to use these cookies as tree ornaments, make a hole with a straw so that they can be hung later.)  Refrigerate scraps and reroll.
4.   Bake until edges are golden, 10 to 12 minutes, then cool cookies completely on baking sheet on a rack, about 10 minutes. Peel off of the parchment and store, separated by layers of parchment to prevent sticking.

Makes about 4 dozen cookies

Sparkling Lemon Snowballs

And I shall call you an appropriate, holiday-themed name…a Sparkling Lemon Snowball!  This is another Gourmet “Favourite Cookie”, although I did make several alterations to the recipe.  I wish that these were frozen and you could hang them around the room, because they really are beautiful and sparkly in reality.

In other news, I am readying myself for some intense holiday baking (my FAVOURITE activity of the year)!  Unlike years past, I have decided to rid myself of the cookies by feeding them to other people, rather than simply consuming them all myself.  Anyway, I am extremely excited for that, too.

sparkling lemon snowballs

Sparkling Lemon Snowballs
1 1/3 c all-purpose flour
2/3 c cornstarch
1/4 tsp salt
2 sticks (1 c) unsalted butter, at room temperature
1/2 c confectioners sugar
1 tbs grated lemon zest
1 tsp vanilla
Food colouring
Sanding sugars

For filling:
1 c confectioners sugar
1 tbs grated lemon zest
1 tbs fresh lemon juice
2 tbs light corn syrup
1/4 c butter-flavoured vegetable shortening

1.  Preheat oven to 350oF with rack in middle. Line 2 baking sheets with parchment paper.  In a medium bowl, whisk together flour, cornstarch, and salt.

2. Beat together butter and confectioners sugar until pale and fluffy, then add in lemon zest and vanilla. Gradually mix in flour mixture just until a soft dough forms.

3.  Put sanding sugars in different bowls. Roll a scant teaspoon of dough into a ball and roll in sugar to coat, then transfer to a baking sheet. Repeat, spacing balls 3/4 inch apart, until baking sheet is filled.

4. Bake until tops are slightly cracked but still pale (bottoms will be pale golden), 12 to 15 minutes. Transfer cookies on parchment to a rack to cool completely.

5.  Beat together all filling ingredients in a large bowl with an electric mixer at medium speed until combined well.  Spread about 1/2 tsp on half of the cookies.  Sandwich with remaining cookies, pressing gently.

Makes about 30 cookies

Palets des Dames

This is a recipe largely borrowed from a 1952 volume of Gourmet magazine. Palets des dames are similar in texture to madeleines, cakey-cookies which are ubiquitous in France (Wikipedia defines madeleines as mini-cakes but I think of them as cookies with a cakey texture). Anyway, palets des dames differ from madeleines because they have the addition of currants. They are also piped, rather than requiring the special mould needed for madeleines.

palets des dames

Palets des Dames
4 tbs currants
2 tbs rum
1/2 c butter
1/2 c granulated sugar
2 eggs
1 c all-purpose flour, sifted

1. Soak the currants in the rum for half an hour, until they are plumped.
2. Preheat oven to 450oF and line 2 baking sheets with parchment paper. In a large bowl, cream together the butter and granulated sugar until the mixture is light and fluffy. Beat in the eggs, one at time. Stir in sifted flour, followed by the currants and rum.
3. Put the batter into a pastry bag fitted with a large round tube and press mounds about the size of a half dollar onto the prepared baking sheets. Bake the cookies for about 5 minutes, or until lightly browned. Remove the palets de dames to a cake rack to cool.

Makes about 30 cookies